Radon mitigation isn’t complicated because it’s mysterious. It’s complicated because every house leaks radon differently — through different cracks, joints, sumps, slabs, crawlspaces, and pressure conditions that are unique to that specific home, on that specific lot, with that specific foundation.
That’s why Royal Radon’s approach is straightforward on purpose: data first, decisions second, hardware last.
If you’re the kind of homeowner who wants to see proof rather than a pitch — who’d rather understand why a system was designed a certain way than simply trust that the technician knew what they were doing — this guide is for you.
Step 1: Start With the Number That Actually Matters
Before any mitigation conversation begins, you need a reliable radon reading. And not just any reading — the right kind.
Radon levels fluctuate constantly. They shift hour to hour, day to day, and season to season depending on temperature, barometric pressure, ventilation habits, and a dozen other variables. A single snapshot doesn’t tell you much. What matters is your long-term average — the number that best represents your actual ongoing exposure.
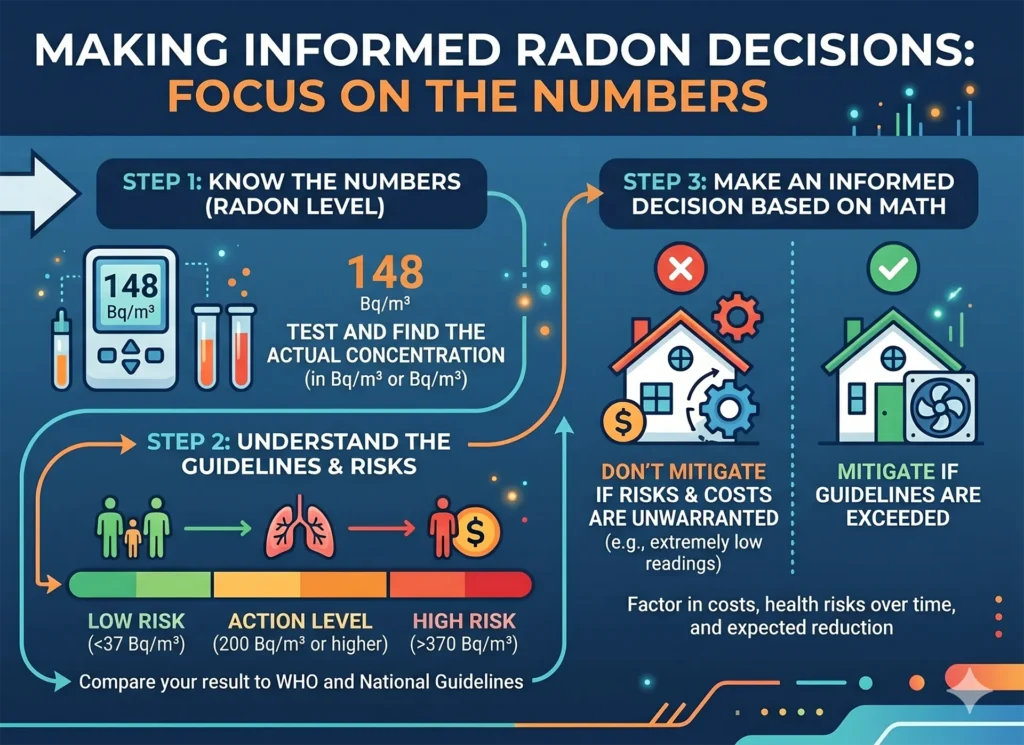
Health Canada is clear on this: the Canadian radon guideline is 200 Bq/m³, and the only way to know whether your home is above or below that threshold is to test. For decision-making purposes, a long-term test — a minimum of three months, ideally conducted during the fall and winter when homes are closed up and readings tend to be higher — is the gold standard. It’s the number that responsible mitigation decisions should be built on.
Short-term tests (typically two to seven days) do have their place. They’re useful for real-estate timelines, initial screening, or checking whether an existing system is performing. But a short-term result used as the sole basis for a major mitigation decision should always be followed up with a longer-term measurement to confirm.
If a company is quoting you a full mitigation system based on a two-day test alone, that’s worth asking about. The radon testing process matters just as much as the mitigation work that follows.
Step 2: Diagnostics That Actually Change the Design
Here’s where “data-first” separates itself from “install and hope.”
Plenty of companies can put in a fan and a pipe. The meaningful question is whether the system was designed from site-specific observations — or simply installed out of habit. A cookie-cutter approach might work. It might not. And without proper diagnostics, you won’t know the difference until your post-install test comes back.
Depending on the home, a proper diagnostic process can involve identifying the most likely radon entry routes — sump pits, slab cracks, cold joints, utility penetrations — and using that information to make deliberate design choices. Suction point locations are chosen based on the home’s layout and how sub-slab conditions are likely to behave. Pipe routing is planned to protect finished living spaces and maintain reasonable curb appeal. Fan specifications are selected based on what the home actually needs, not simply defaulted to the largest available option “just to be safe.”
The outcome you should expect from a professional consultation isn’t just “we installed a system.” It’s a clear explanation of why this particular system layout fits this particular house — and a commitment to verify that it’s actually working.
Step 3: What "Documented Mitigation" Looks Like
When a company describes itself as evidence-based, you should be able to point to the evidence. Documentation isn’t a bonus feature — it’s how you protect yourself and confirm that the work was done properly.
A solid documentation package from a mitigation project typically includes:
- A written scope of work — what’s included in the project, what’s considered optional, and what could affect the outcome
- Key equipment details — the fan model used, the piping path taken, and the discharge location
- Photos — before and after, capturing the routing decisions made and the installation as completed
- A post-mitigation verification plan — specifying what will be tested, when testing will happen, and how the results will be interpreted
Health Canada advises using certified professionals and C-NRPP-recognized practices and devices for both measurement and mitigation. When you’re comparing quotes, it’s reasonable to ask whether the company and its technicians hold current C-NRPP certification — it’s one of the clearest signals that they’re working to a recognized standard.
Royal Radon’s radon mitigation services are built around this kind of structured documentation. If you can’t point at the evidence, “evidence-based” is just a phrase.
Step 4: Verification — The Part That Makes Everything Real
Installation day is not the finish line. It’s somewhere in the middle.
Health Canada is explicit: if your home tests above the guideline, corrective action is recommended, and the higher the level, the sooner you should act. But mitigation without verification is a bit like taking medication and never checking whether it worked. The installation creates the conditions for improvement. Verification is how you confirm improvement actually happened.
Mitigation should be considered complete only when three things are true:
- You have post-installation test results in hand
- You understand what those results mean in the context of your home
- You have a plan for re-testing going forward
That’s how you avoid what might be called the “installed once, never checked again” problem — a situation where a system sits in a basement looking functional while no one has actually confirmed it’s performing as intended.
If you’re currently researching your options and weighing DIY testing before booking a professional, the DIY radon testing guide and top monitor recommendations on this site are good places to start building your baseline knowledge.

A Practical "Data-First" Checklist You Can Use to Compare Companies
If you’re gathering quotes from multiple radon contractors, the following questions can help you evaluate whether each company’s approach is genuinely measurement-driven — or whether they’re leading with hardware and filling in the rationale afterward.
Before you book:
- What test result are you using as the basis for this recommendation — short-term or long-term?
- Which spaces in the home count as “normal occupancy areas” for this assessment?
- What foundation types are involved — slab, sump, crawlspace, or a combination?
At quoting time:
- Do you provide a written, accurate quote that clearly identifies the scope of work?
- What factors might change the scope between quote and installation?
At installation:
- How is the pipe being routed, and what considerations are being made for noise and finished living areas?
- Where is the discharge located, and how are re-entry risks managed?
After installation:
- What verification test will be conducted, and on what timeline?
- What’s the process if post-mitigation results are still above the guideline?
If a contractor struggles to answer these questions clearly, that’s useful information.
Three Illustrative Scenarios: How "Data-First" Changes Decisions
These scenarios are fictional but reflect the kinds of real-world variation Calgary homes present — and why a one-size-fits-all approach tends to fall short.
Scenario 1: 1970s bungalow with an unfinished basement and sump pit Long-term testing returns an initial average of 520 Bq/m³. Diagnostics point to the sump as the primary entry route. The mitigation design connects suction at the sump and incorporates targeted sealing. Post-mitigation long-term testing confirms a reduction below the guideline.
Scenario 2: Split-level home with a mixed slab from an addition Readings vary meaningfully from room to room, putting the overall average in a borderline-to-moderate range. The diagnostic process informs suction placement and a routing plan specifically designed to avoid opening finished ceilings. Verification testing confirms a stable reduction, and a clear re-test schedule is established.
Scenario 3: Newer, airtight home with a passive radon rough-in Despite the home’s “radon-ready” marketing, long-term testing reveals high readings. The rough-in was installed but never activated — and passive systems don’t guarantee performance. The design decision is to activate the rough-in as an active system and verify results. Documented post-mitigation testing confirms the reduction.
The takeaway from all three: the data shaped the decision. Not the other way around.
Book a Data-First Radon Assessment in Calgary
Radon is invisible, odourless, and genuinely worth understanding — but it doesn’t have to be stressful. The right approach is calm, methodical, and built on measurement rather than guesswork.
If you’d like evidence-based guidance on where your home stands and what — if anything — needs to be done about it, Royal Radon is ready to help.
Book your radon assessment online, or call or text (403) 614-4094 to get started.